目次
1.はじめに
皆さんこんにちは。
今回からDatabricks Notebook から MySQL または SQL Server にデータを更新する方法について説明していきます。
この度は、MySQLのサンプルデータベースを使用し、Databricks Notebook を使用して MySQL データベースにデータをアップデートする 2 つの方法を説明します。
Databricksワークスペースで必要な権限は既に設定されしました。
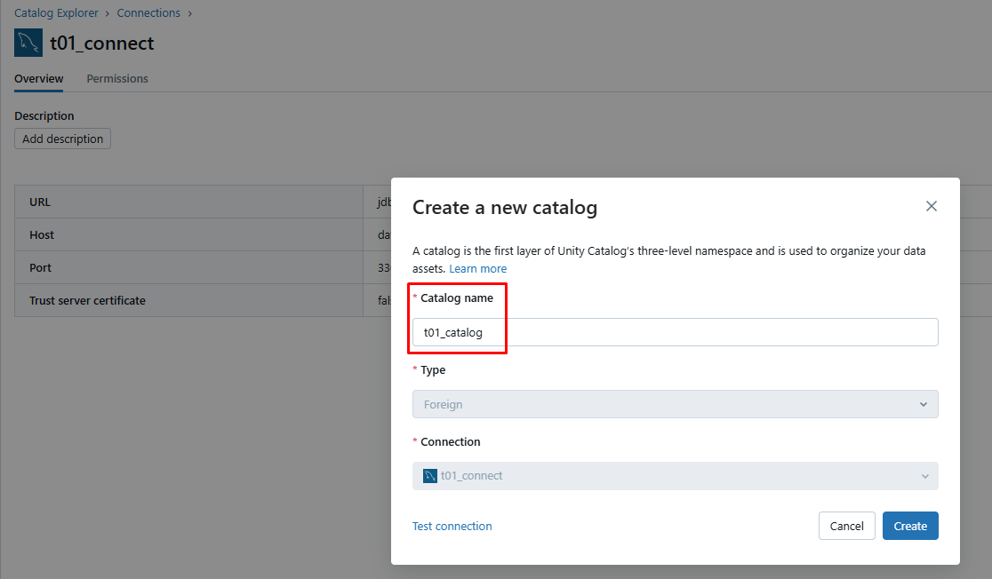
MySQL データベースのデータをAzure Databricksの外部カタログに直接反映させます。
Azure Databricksの外部カタログの作成方法については、以下のリンクを参照してください。
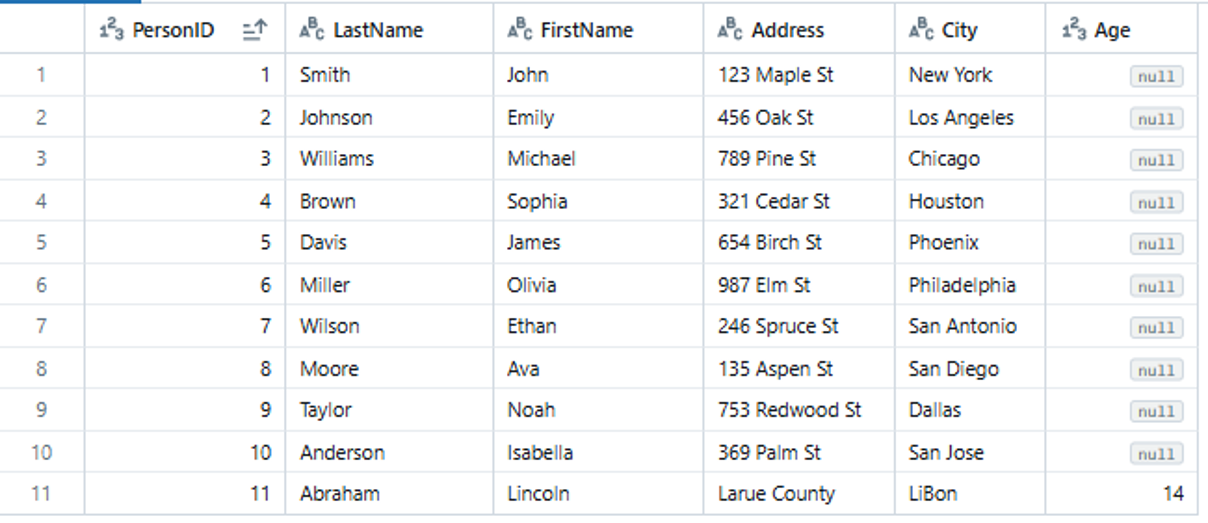
これはデータ更新前の MySQL データベースにある person テーブルのデータです。
PersonIDが11のレコードについて、CityカラムとAgeカラムのデータを更新します。
2.データ更新の方法
2-1.Spark DataFrames (Apache Spark のリレーショナル データベースの一種) を使用する
DataFrame を使用したアップデートの手順
- Azure で MySQLデータベースに接続するための JDBC コネクタを作成します。
- MySQL データベースからすべてのデータを DataFrame にロードします。
- Delta フォーマットに変換します。
- Delta テーブルでデータを更新します。
- 更新されたデータを MySQL データベースに書き戻します。
|
1 2 3 4 5 6 7 8 9 10 11 12 13 14 15 16 17 18 19 20 21 22 23 24 25 26 27 28 29 30 31 32 33 34 35 36 37 38 39 40 |
# 1. Load all data from MySQL into a Spark DataFrame # This step establishes a connection to Azure MySQL and reads the entire table jdbcUrl = "<your_jdbc_connection_url>" connectionProperties = { "user" : "<your_username>", "password" : "<your_password>" } mysql_df = spark.read.jdbc( url=jdbcUrl, table="<your_table_name>", properties=connectionProperties ) # 2. Convert to Delta format # Store the data in Delta Lake format, overwriting any existing data in the specified path mysql_df.write.format("delta").mode("overwrite").save("<your_delta_table_path>") # 3. Update records in Delta table # Initialize DeltaTable object and perform update operation # Here we're updating specific columns for a specific condition from delta.tables import DeltaTable delta_table = DeltaTable.forPath(spark, "<your_delta_table_path>") delta_table.update( condition="<your_update_condition>", set={ "<column1>": "<new_value1>", "<column2>": "<new_value2>" } ) # 4. Read updated data and write back to MySQL # Load the modified Delta table into a new DataFrame # Attempt to overwrite the original MySQL table with updated data updated_df = spark.read.format("delta").load("<your_delta_table_path>") updated_df.write.jdbc( url=jdbcUrl, table="<your_table_name>", mode="overwrite", properties=connectionProperties ) |
作成した外部カタログ内のpersonテーブルを選択して、データ更新後の確認を実行します。
PersonID が11のレコードについて、AgeカラムとCityカラムのデータが元の値から新しい値に更新されていることが確認できます。
注意
- この更新方法は、テーブル全体をロードする必要があるため、個別のレコードや少量のレコードの更新には適していません。
- 複雑なロジックによるデータ変換、複数のデータソースとの結合が必要なデータ更新に適しています。
2-2.pymysql (Python ライブラリの一種) を使用する
pymysql を使用したアップデートの手順
- pymysql ライブラリをインストール。
- PyMySQL Connection を使用して AzureでのMySQLデータベースに接続を作成します。
- SQL アップデートコマンドを実行するためのカーソルオブジェクトを作成します。
- 現在のトランザクションのすべての変更をデータベースにコミットします。
|
1 2 3 4 5 6 7 8 9 10 11 12 13 14 15 16 17 18 19 20 21 22 23 24 25 26 27 28 29 30 31 32 33 34 35 36 37 |
# Install pymysql package using pip %pip install pymysql import pymysql def update_mysql_record(): # Establish a direct connection to MySQL database connection = pymysql.connect( host='<your_host>', user='<your_username>', password='<your_password>', database='<your_database>' ) try: # Create a cursor object to execute SQL commands with connection.cursor() as cursor: # Define the SQL UPDATE statement with parameterized queries # %s are placeholders for parameters to prevent SQL injection sql = """ UPDATE <your_table_name> SET <column1> = %s, <column2> = %s WHERE <condition_column> = %s """ # Execute the UPDATE statement with parameters # Replace values with your specific update requirements cursor.execute(sql, (<new_value1>, <new_value2>, <condition_value>)) # Commit the transaction to make changes permanent connection.commit() finally: # Ensure connection is closed even if an error occurs connection.close() # Execute the update function update_mysql_record() |

作成した外部カタログ内のpersonテーブルを選択して、データ更新後の確認を実行します。
PersonID が11のレコードについて、AgeカラムとCityカラムのデータが元の値から新しい値に更新されていることが確認できます。

注意
- この更新方法は、大量のデータ(ビッグデータ)の更新や複雑な処理には適していません。
- 少量のレコードの更新、リアルタイムまたはニアリアルタイムの更新、そして複雑でない更新処理に適しています。
3.まとめ
本連載では、
Databricks Notebook から MySQL または SQL Server にデータを更新する方法について説明しました。
今回の記事が少しでもDatabricksを知るきっかけや、業務のご参考になれば幸いです。
双日テックイノベーションでは、Azure Databricksの環境構築パッケージを用意しています。
Azure DatabricksやAzure活用、マイクロソフト製品の活用についてご相談事がありましたらぜひお問い合わせください!
・Azure Databricks連載シリーズはこちら
この記事を読んだ方へのオススメコンテンツはこちら
この記事を書いた人
- phongcq


